Holiday Gift Ideas with a Scroll Saw

Ornaments and Small Decor Why It’s Great: Ornaments are quick, affordable, and endlessly customizable. How To Do It: Choose seasonal shapes like snowflakes, stars, or holiday animals. Trace your design onto a thin piece of wood (such as 1/4-inch birch plywood) and cut along the lines with your scroll saw. For an added touch, paint the pieces in festive colors or leave them natural for a rustic look. Gift Idea: Package a small set of three ornaments in a small box with ribbon for a thoughtful, handmade present. 2. Personalized Name Plaques These add a personal touch and can fit any holiday decor style. How To Do It: Use simple lettering to cut out names or words like “Joy,” “Peace,” or “Noel.” Start with a flat wood piece, draw the letters, and carefully cut around them. Consider using slightly thicker wood (around 1/2-inch) for stability.
Gift Idea: Personalize each plaque with the recipient’s name and holiday colors. Displayed on a shelf or mantel, this gift will bring joy year after year. Holiday Trivets or Coasters Trivets and coasters are useful and decorative—perfect for holiday parties. How To Do It: Cut holiday designs (like a Christmas tree or snowflake) into pieces of hardwood, making sure they’re durable for hot dishes or drinks. Sand each piece smoothly to avoid rough edges and add a food-safe finish for extra protection. Gift Idea: Bundle a set of four with a festive ribbon for a lovely hostess or family gift. 4. Mini Wooden Christmas Trees or Reindeer These look adorable on a table centerpiece or as standalone decor. How To Do It: Use a scroll saw to cut out shapes of trees or reindeer from sturdy wood. Stack two or three different-sized tree cutouts together for a three-dimensional effect, or paint a simple reindeer silhouette. Gift Idea: Arrange a small grouping of trees and reindeer on a wood base, and gift them as a decorative holiday set.

Thanksgiving Day Turkey Pattern

Go here to our sister site for a svg downloadable pattern >>>>>>> https://www.freecraftpattern.com/

The Benefits of Using Birchwood for Laser Cutting: Why Its the Ideal Material

Birchwood is an excellent material for laser cutting, offering several advantages that make it a popular choice among hobbyists and professionals alike. Here are some key benefits: 1. Durability Birchwood is known for its strength and durability. It has a fine, even grain that gives it excellent structural integrity, making it resistant to warping and splitting. This quality allows for precise cuts and detailed designs, ensuring that finished products maintain their shape and integrity over time. 2. Aesthetic Appeal The natural beauty of birchwood is another significant advantage. It features a light, uniform color with a smooth texture that can be easily stained, painted, or left in its natural state. The attractive appearance of birchwood enhances the visual appeal of laser-cut projects, making it ideal for decorative items, furniture, and art pieces. 3. Versatility Birchwood is highly versatile and can be used in a wide range of applications. It is suitable for various projects, from intricate designs like jewelry and signage to functional items like boxes and furniture. Its compatibility with different laser cutting techniques allows for both engraving and cutting, providing endless creative possibilities. 4. Ease of Cutting Laser cutting birchwood is efficient due to its relatively low density, which allows for clean cuts and minimal charring. This ease of cutting reduces the need for extensive post-processing, saving time and effort in project completion. 5. Sustainability Birch is often sourced from sustainably managed forests, making it an eco-friendly option for those looking to reduce their environmental impact. Choosing birchwood supports responsible forestry practices while also providing a beautiful material for crafting. 6. Cost-Effectiveness Compared to other hardwoods, birchwood is generally more affordable, making it accessible for both beginners and experienced makers.

Make Halloween Ghost Magnets

Magnets Materials for this project: birchwood 1/16" or 1/8" thick. Magnets for the backs used are business card magnets from online. The svg files to cut this is available on followthemoonart Etsy.

Santa Claus Christmas Ornament

Primitive Style Wood Santa Claus craft pattern
Free SVG file for Primitive Santa
How to Use This Free Primitive Santa Claus Pattern This simple and fun craft is perfect for adding a handmade touch to your holiday decor. Here’s how you can use this pattern: Start by downloading the pattern from the link provided. Print it out at the desired size for your Santa Claus project. For laser cutting - click here for link Transfer the Design: Place the printed pattern onto your piece of wood. You can trace the design directly onto the wood using a pencil or transfer it using carbon paper. Cut Out the Shape: Choose your preferred cutting method: Scroll Saw: For detailed and intricate cuts. Band Saw: For quick and efficient cutting of thicker wood pieces. Laser Cutter: For precise and clean edges (ensure your settings are appropriate for wood). Sand the Edges: Once you’ve cut out the shape, lightly sand the edges to smooth out any rough spots. Paint Your Santa: Use acrylic paints to bring your Primitive Santa Claus to life. Add details and colors as you like to make your Santa uniquely yours! Display and Enjoy: After the paint dries, your Primitive Santa is ready to be displayed as a charming addition to your holiday decor!

Deer Ornament craft pattern to make

You can find more outdoor craft craft patterns like these here at our sister site :

APRIL IS DISTRACTED DRIVING AWARENESS MONTH

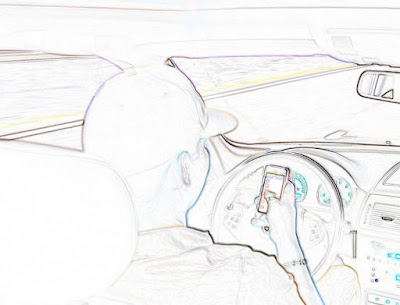
During April, organizations and individuals across the country will be working to raise awareness about the dangers of distracted driving. This might include public service announcements, educational events, or social media campaigns aimed at encouraging drivers to keep their eyes on the road and avoid distractions like texting, eating, or using their phones while driving.
Distracted driving is a serious problem on the roads today, with countless accidents and fatalities occurring every year due to drivers not paying attention to the task at hand. That's why April is designated as distracted driving awareness month, a time for us all to focus on the importance of staying focused while behind the wheel.
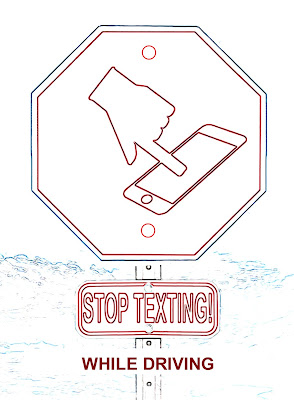
As a responsible driver, it's important to remember that distracted driving can have serious consequences, not just for yourself but for everyone around you. By staying focused and alert while behind the wheel, you can help ensure that everyone on the road stays safe and that we all arrive at our destinations without incident. So this April, let's all make a commitment to put down our phones and stay focused on the road ahead.

Memorial Day Arts & Crafts
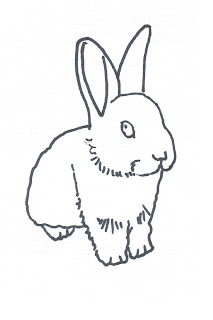
Memorial Day is just around the corner, and what better way to celebrate than with some DIY wood crafts? From patriotic decor to outdoor games, there are endless possibilities for creating unique and personalized pieces that will add a special touch to your holiday celebrations.
Not only do these crafts make great decorations, but they also make thoughtful gifts for friends and family. So, whether you're a seasoned DIYer or a beginner looking to try something new, we've got you covered with some ideas and inspiration for your Memorial Day wood crafts. Get ready to roll up your sleeves, grab some wood, and let your creativity shine!

Easter Wood Crafts

Easter is coming up, and what better way to get ready than by making your own bunnies and Easter decorations! If you have some scrap wood lying around, you can use it to make your very own Easter-themed crafts. Whether you’re using a laser cutter or just a few simple tools, crafting wooden Easter decorations is a great way to get creative and put your own spin on things. To start, consid er making small bunnies with your scrap wood. You can customize them however you’d like—from the size and shape of the ears to the color of the fur. Don’t forget to add in colorful details like eyes, whiskers, and ribbons for a unique look. To complete the look, make Easter baskets and colorful eggs as well. By doing so, you’ll be able to create an adorable Easter display that your family will love!

FREE SAW PATTERNS


The handy boy; a modern handy book of practical and profitable pastimes


GET READY FOR THE WINTER AND CREATE A BIRDHOUSE


PATTERN OUTLINE 
FOR CABIN IN THE WOODS BIRDHOUSE
Click on and print out side view of house.
 Cut 2
Noting the measurements in the picture, cut out a base
and roof for the top.
When finished paint if preferred with
acrylic paints.

Make ahead - Delightful skiing Christmas ornaments

      MAKE FUN AND COLORFUL WOOD

   CHRISTMAS ORNAMENTS IN JULY!


                 Create these 2 wintertime ornaments for the tree to give as gifts or to sell
  
PATTERN OUTLINE 
FOR CUTTING 
WITH SCROLLSAW
OR
LASER WOOD CUTTING


Scroll saw or laser cut bunny puzzle

 Make a bunny puzzle ~ Scroll saw or laser cut

INSTRUCTIONS: See below for image 

1) Click on color picture and print the bunny puzzle image. The quality is good enough for a nice mini puzzle.

2) Print out the template  design on the right to use as a guide for for the puzzle lines. Glue the picture image on a piece of thin birch or 1/2″ wood. Use a white glue such as Elmer’s. Spread out a thin layer of glue and be sure to carefully smooth out all the bubbles.Once the glue on the image has dried place the lite puzzle design of lines over the print and adhere it by carefully using masking tape to hold it in place /be careful not to tear the print. One you have cut out the puzzle pieces -you can now lightly sand each individual piece with a paper nail file. After this step you can lightly coat the puzzle pieces with layer of water based satin varnish for protection. 


Free bunny clip art for making scroll saw or laser cut puzzle

1. Right clip image and print onto card stock paper.
2. Glue using Elmer's white glue both the back of the    paper and the wood surface.
3. Adhere the image to the wood
4. Let dry
5. Lightly tape the puzzle design (around the edges) on top of the  glued clip art then cut out puzzle lines.